Use the Adjustment window to record any adjustment to accounts. The window can be configured in two distinctively different ways using the options found in Adjustment Option>Edit Mode and can be customized further using Column Configuration.
Select Activities>Enter Adjustment.
Use the Data Bar at the top of the Adjustment dialog box for common commands.
- If you position your cursor over an item in the Data Bar, a short examination of the command will appear.
- Right-click on the Data Bar to customize the Data Bar.
Enter adjustments in the grid. The way amounts are entered will depend on the selected Adjustment Options. Your business advisor will give you guidance on which style is best suited for you and how adjustments should be made.
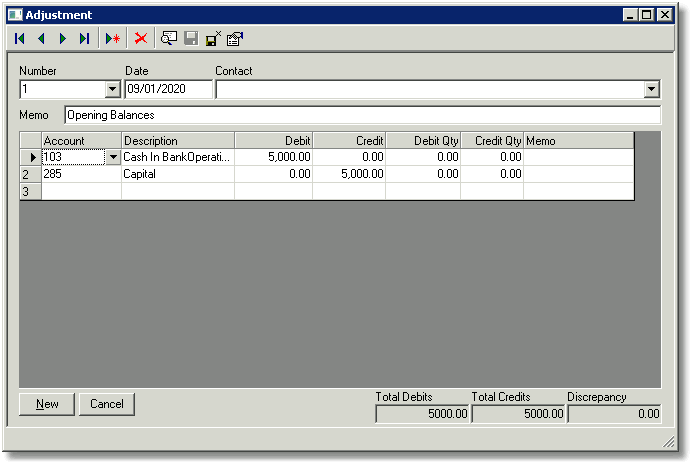
The following screenshot shows the Adjustment window used to make adjustments using the Debit and Credit columns.
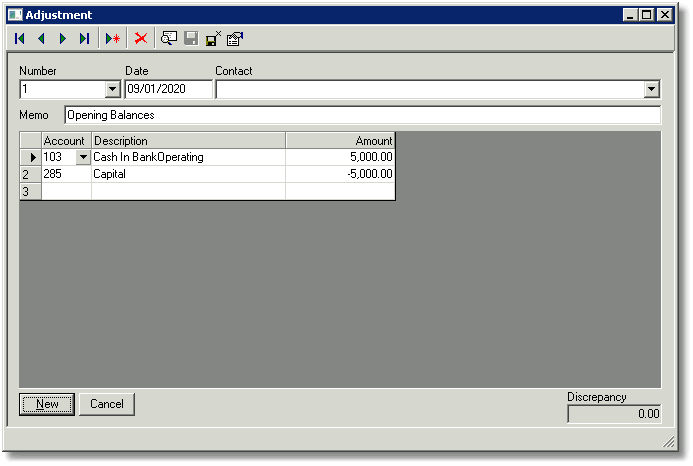
The following example shows the Adjustment window used to make adjustments using the Amount column.
Adjustment Options
Click the  icon on the Data Bar or select Edit>Commands>Screen Options when the Enter Adjustments window is open.
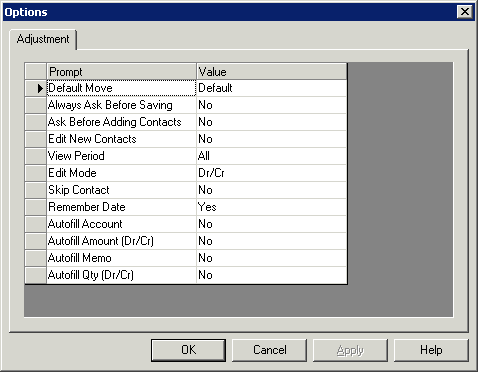
Default Move
-
Default—The window will always open for a new transaction.
-
First—The window will always open to the first transaction for the period covered (see Options>View Period) in numeric order.
-
Last—The window will always open to the last transaction for the period covered (see Options> View Period) in numeric order.
-
New—The window will always open for a new transaction.
Always Ask Before Saving
-
Yes—A dialog box will open with the options Yes, No, or Cancel every time before advancing to enter a new transaction.
-
No—The transaction will be saved automatically when advancing to enter a new transaction.
Ask Before Adding Contacts
-
Yes—When a name is entered in the Contact field that does not match the Lookup for any contact in the Contact Manager, a dialog box is presented asking if you want to add the contact. If you click No, the name in the Contact field will be cleared.
-
No—When a name is entered in the Contact field that does not match the Lookup for any contact in the Contact Manager, the program creates a new contact for the name automatically, without asking.
- Exception: If the user does not have User Permission to access the Contact Manager, the new contact will not be added.
Edit New Contacts
-
Yes—Opens the Contact Manager window so that additional information can be filled out for the new contact.
-
No—The Contact Manager window will not be opened when a new contact is created.
- Exception: If the user does not have permission to access the Contact Manager, the Contact Manager dialog box will not open.
View Period
The selected options control what deposit will be displayed in the List  , as well as which deposits can be accessed in the window when scrolling through the deposits, using the Data Bar commands.
-
Accounting Year to Date—Includes all deposits for the current accounting year.
-
All—Includes all deposits.
-
Current Accounting Period—Includes all deposits within the current accounting period.
-
Last 30 days—Includes all deposits with dates within 30 days of the current date.
-
Last 60 days—Includes all deposits with dates within 60 days of the current date.
-
Last 90 days—Includes all deposits with dates within 90 days of the current date.
-
Last Year—Includes all deposits with dates within the last calendar year.
-
Year to Date—Includes all deposits with dates within the current calendar year.
Edit Mode
This option sets up the Disbursement grid of the Adjustment with columns that best suit the user. When a change is made in Edit Mode, the Adjustments window must be closed and reopened for the change to be applied.
-
Amount—When this mode is selected, an Amount column is included. Debit amounts are entered as a positive, and credit amounts are entered as a negative.
-
Dr/Cr—When this mode is selected, Debit and Credit columns are included.
Skip Contact
-
Yes—Causes the cursor to skip over the Contact field when pressing Enter or Tab to move through the window. The Contact field can still be accessed with the mouse.
-
No—Causes the cursor to stop in the Contact field when pressing Enter or Tab to move through the window.
Remember Date
-
Yes—Defaults to the date of the last adjustment written.
-
No—Defaults to today's date.
Autofill Account
-
Yes—Defaults to the account entered on the previous item of the adjustment.
-
No—The new item is created with this field blank.
Autofill Amount (Dr/Cr)
-
Yes—Defaults to the amount entered on the previous item of the adjustment.
-
No—The new item is created with this field blank.
Autofill Memo
-
Yes—Defaults to the memo entered on the previous item of the adjustment.
-
No—The new item is created with this field blank.
Autofill Qty (Dr/Cr)
-
Yes—Defaults to the quantity entered on the previous item of the adjustment.
-
No—The new item is created with this field blank.
Comments
0 comments
Article is closed for comments.