Recode Accounts allows you to change the account codes (also called account Lookup) for several accounts.
You may find this necessary for one of the following reasons:
- The account codes for your client files are not consistent, and you want to standardize the account codes within your office.
- You imported the GL accounts from another software which does not have account codes.
- You imported the GL accounts from another software and want to make the account codes consistent with your account code scheme.
- You restored a template file created by another accounting office and want to make the account codes consistent with your account code scheme.
- You need to create a set of accounts for an additional profit center or location.
How to Recode Accounts
- Select Utilities>Recode Accounts.
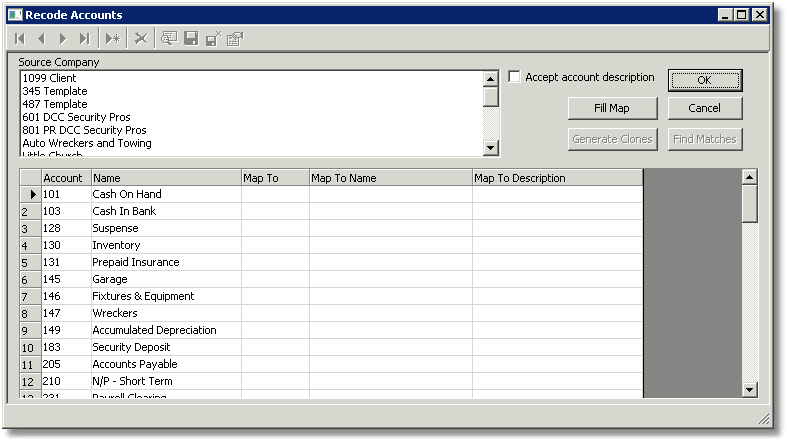
- You can use the features Fill Map or Find Matches, or manually enter account codes.
- When all accounts have been mapped, click OK (unless you want to Generate Clones as well).
Source Company
Selecting a source company is optional. If you do, then the chart of accounts in the source company will be available to select accounts from in the Map To field of each account. This is useful if you have a master file which you want to use as a guide for coding your other client files.
Accept account description
When this option is selected, the account Lookup (account code), Name, and Description of the account will be changed to match the account of the source company. When it is not selected, only the account Lookup will be changed.
Fill Map
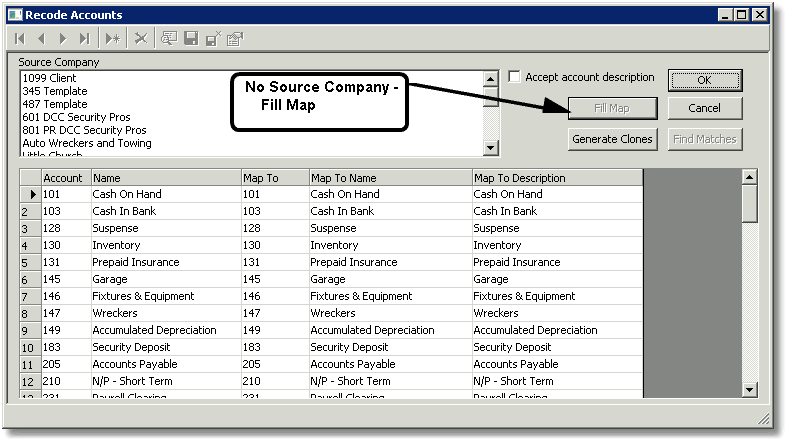
Use this feature to copy the current account to the Map To field and the current Name to the Map To Name field for all accounts. Use this if you have not selected a source company and you want to change only a few account codes, or when you wish to Generate Clones.
Find Matches

If you have selected a source company, you can click on the Find Matches button at the right to automatically map all accounts where the account Name in the source company matches account Name in this company. The account numbers from the source company will be in the Map To fields.
Map To
You can type in an account Lookup code for each line, or, if a source company has been selected, choose an account from the drop-down list of accounts. You can select accounts from the list for some accounts and type in account Lookup codes for others.
If you want the account Lookup code to remain the same, either type in the same Lookup code or double-click in the cell.
Edit a Single Existing Account
To edit a single existing account, double-click on the account Lookup in the Account column.
Generate Clones
Use Generate Clones to create additional accounts by cloning existing accounts. This is primarily used to create an additional set of accounts for an additional location or profit center.
All accounts must be mapped before you can Generate Clones. If you are not changing your account Lookup code scheme but want to create a set of accounts for a new location, click Fill Map.
- Click Generate Clones.
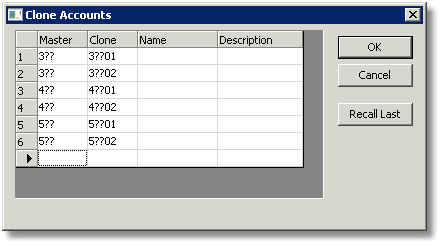
- Complete a row for each group of accounts you want to clone.
- The value in the Master column is the account Lookup code used in the Map To column in the first window.
- Use the question mark (?) wildcard to include any character of the master account at a fixed position. (The Master and Clone must have question marks in the same positions). For example, if you type 3?? in the Master column, all existing accounts that are three characters long and begin with 3 will be cloned.
- The value in the Clone column is the account Lookup code for the new account(s).
- Use the question mark (?) wildcard to include any character of the master account at a fixed position. (The Master and Clone must have question marks in the same positions). For example, if you type 3?? in the Master column and 3??01 in the Clone column, an account with a five-digit lookup starting with 3 and ending in 01 will be created for each account with a three-digit lookup beginning with the number 3.
- The Name column will define the Names of the new accounts.
- If you leave the Name field blank, the Name of the master accounts will be used for the new accounts.
- If you enter a string of characters without any wildcard characters, then the Name for all cloned accounts will have the entered name.
- Use the asterisk (*) wildcard to create new accounts with a different Name. The asterisk adds all characters in the master account that exist beyond the position of the character string you input. For example: If the master account names are: Location 1 Labor, Location 1 Parts, etc., enter Location 2 * to create clones with descriptions of Location 2 Labor, Location 2 Parts, etc. The asterisk adds all characters in the master account name that exist beyond the position of the character string you input.
- Use the plus sign (+) wildcard with a string of characters to create the new accounts with a different Name. To add a string to the end of the account name type _Text+. To add the string in front of the account name type +Text_. Be sure to enter a space at the beginning or end of the field if you want a space between the existing name and the new string of characters.
- The Description column will define the Descriptions of the new accounts.
- Leave the Description field blank and the Description of the master accounts will be used for the new accounts.
- Enter a string of characters without any wildcard characters and the Description for all cloned accounts will have the entered description. Use this field for the description if you want all cloned accounts to be sub-accounts of some other account that shares the same description.
- Use the asterisk (*) wildcard to create the new accounts with a different Description. The asterisk adds all characters in the master account that exist beyond the position of the character string you input. For example: If the Master accounts are: Location 1 Labor, Location 1 Parts, etc., enter Location 2 * to create clones with descriptions of Location 2 Labor, Location 2 Parts, etc. The asterisk adds all characters in the master account that exist beyond the position of the character string you input.
- Use the + (plus sign) wildcard with a string of characters to create the new accounts with a different Description. To add a string to the end of the existing account Description type _Text+. To add the string in front of the account description type +Text_. Be sure to enter a space at the beginning or end of the field if you want a space between the existing description and the new string of characters.
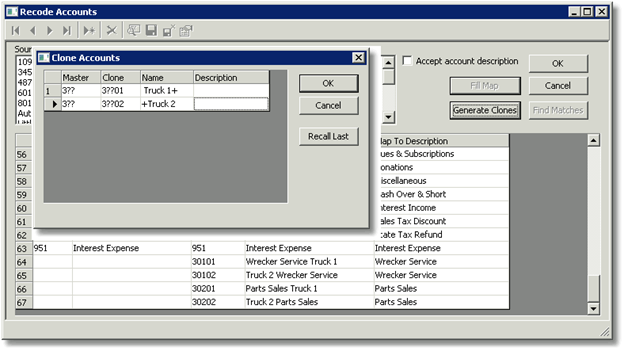
- Click OK to generate the cloned accounts. You will be shown the new accounts in the list along with the currently mapped accounts. Click on any heading to sort the list by that field. At this point, no changes to the accounts have actually been made in the file.
- Click OK to accept the new account structure or Cancel to abort any changes.
Comments
0 comments
Article is closed for comments.