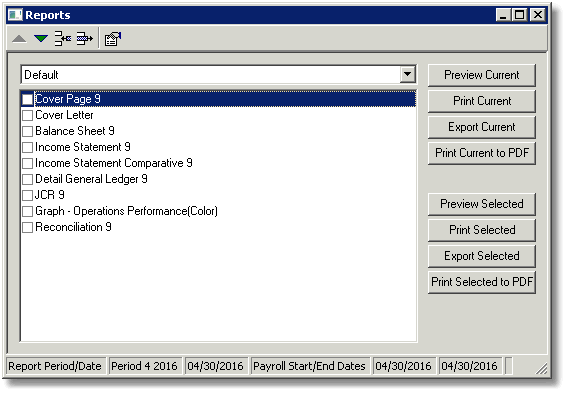
This window lists all reports inserted in the Report Group selected from the drop-down list in the first field at the top of the window.
Select Reports>Report List.
See Profit Center Reporting at the end of this topic.
- Right-click in the Reports window.
- Select an action from the menu.
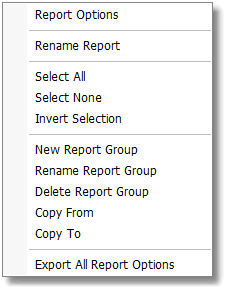
Report Options
The desired report must be highlighted before opening the right-click menu.
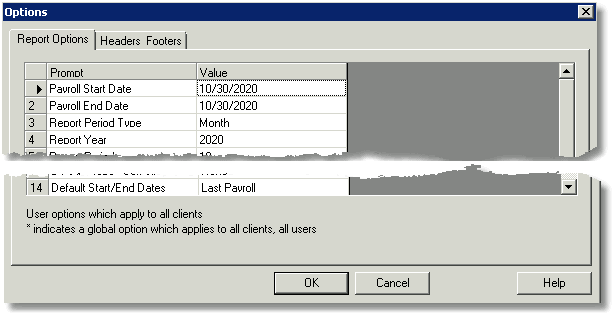
- Depending on the report, the Report Options dialog box may take a few seconds to appear. The following screenshot is an example showing the options for Income Statements reports. Most of the options for all reports are self-explanatory and many are applicable to most reports.
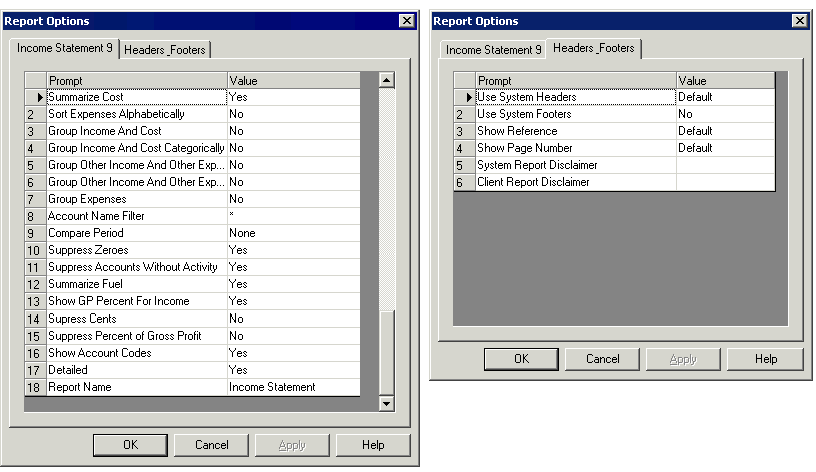
- Following are explanations for options found on most reports:
-
Account Name Filter—Filters the accounts that will appear in the report, using wildcard characters.
-
*—When an asterisk is added to the end of an Account Name, the system accepts all characters to the right of the symbol. When this is the first character, the system accepts all characters to the left of that position.
-
?—The system accepts any characters in the position of the question mark.
-
Example: If profit centers are defined by the 4th and 5th character of the Account Name (meaning 30101 and 30102 could be a sales item for locations 01 and 02), then ???01 would include all accounts where 01 is in the 4th and 5th positions. Writing ???01* would include any additional characters, such as 51601.1.
-
Detailed—Controls the printing of sub-ledger accounts.
-
True—Includes all accounts by Account Name.
-
False—Summarizes all accounts with the same Account Description into one account.
-
Report Name—This is the name that appears at the top of the report when printed.
-
Top Offset—A value entered in this field will affect the vertical placement of the report. Enter value as decimal (.25=1/4 inch). Enter a positive value to increase the top margin or move the print down on the page. Enter a negative value to decrease the top margin or move the print up on the page.
-
Left Offset—A value entered in this field will affect the horizontal placement of the report. Enter value as decimal (.25=1/4 inch) Enter a positive value to increase the left margin or move the print to the right on the page. Enter a negative value to decrease the left margin or move the print to the left on the page.
-
Header Footers Tab
-
Use System Footers—This option is not applicable at this time.
-
Hide Period in Header—Yes removes the period information from the header of all reports.
-
Show Reference—Prints a reference number either in the upper right corner or lower left corner of all reports.
-
No removes the Reference from the report.
-
Default accepts the setting from the Global Reports Options for this option.
-
Show Page Number—Prints a page number in the lower right corner of the report. Numbering applies to the number of pages for each report, not the number of pages in a batch of reports.
-
No removes the page number from the report.
-
Default accepts the setting of the Global Reports Options for this option.
-
System Report Disclaimer—Record a disclaimer here that will be printed in the footer section of the report for all clients, unless there is a different Client Report Disclaimer recorded for the client. If the disclaimer is longer than one line, the program will break the text into multiple lines. A hard return can be added where desired by typing two backslashes (\\). There cannot be blank spaces after the backslashes.
-
Client Report Disclaimer—Record a disclaimer here that will be printed in the footer section of the report for the current client only. If the disclaimer is longer than one line, the program will break the text into multiple lines. A hard return can be added where desired by typing two backslashes (\\). There cannot be blank spaces after the backslashes.
Rename Report
Use this to change the name of the report as it appears on the Reports List window.
Select All
Selects all reports in the group for printing.
Select None
Removes all selections in check boxes.
Invert Selection
Switches the reports that are selected and not. This deselects previously selected reports, and selects reports that were not previously selected.
New Report Group
This action creates a new Report Group.
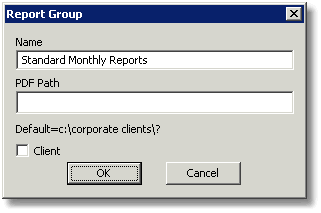
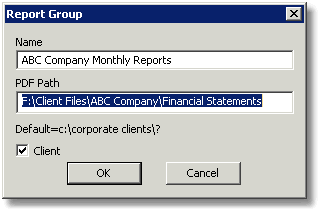
- Enter the Name of the Report Group.
- Select Client if the report group should be available only to the current client. Do not select Client if the report group should be available to all clients.
Rename Report Group
Change the Name of the report group that is currently open, or change the selection of the Client checkbox.
Delete Report Group
Delete the Report Group that is currently open.
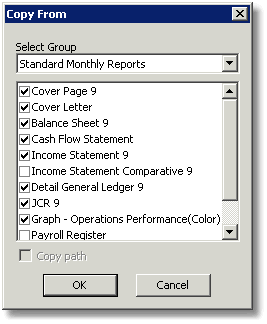
Copy From
Use this action to copy reports from one group into another, including all report option settings. You can use this to easily create a report group for a new client by copying the reports from your firm's standard reports group. After the reports have been copied into the new report group, fine-tune the option settings to suit the specific client. Select the group that reports will be copied from in the drop-down list of report groups at the top of the dialog box. Select each desired report, or right-click and click Select All for all reports in the group.
Copy To
This enables a new report to be added to one or all existing report groups. First set the Report Options on the new report as desired. Highlight the new report, right-click, and select Copy To. Select the report groups that the report should be copied to, or right-click then click Select All to send to all groups.
Print or View a Report
- Highlight the report in the Reports window.
- Click Preview Current or Print Current to preview or print the highlighted report.
Print or View Multiple Reports
- Click the checkbox to the left of reports to print or preview. To select all the reports in the Report Group, right-click and click Select All.
- Click Preview Selected or Print Selected to preview or print the reports.
- Reports will be displayed or printed in the order of the list.
- To change the order, highlight each report and either press Shift+Up or Down arrow keys, or use the Move Row Up or Move Row Down icons in the Data Bar at the top of the window to move the report within the list.
Export One or Multiple Reports
- Highlight or select report(s).
- Select Export Current or Export Selected.
- Select the desired Format and Destination then click OK.
Print Current or Selected to PDF
- Highlight or select report(s).
- Select Print Current to PDF or Print Selected to PDF.
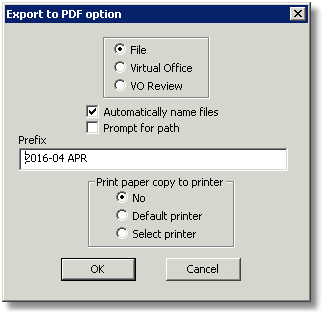
- Select the desired option for PDF.
-
File—Creates PDF file(s).
-
Virtual Office—The default browser window will open to the Virtual Office portal for this client. The PDF file will be selected for upload. Enter or select an email message and upload the file. This option is only available if the VO Client ID is entered on the Company Tab in Setup>Company Information.
-
VO Review—The default browser window will open to the Virtual Office portal for this client. The PDF file has been selected for upload. Enter or select an email message and upload the file to the Review Queue. This option is only available if the VO Client ID is entered on the Company Tab in Setup>Company Information.
-
Automatically name files—Check this box to use the default name options defined in Report Options. The prefix will be displayed in the Prefix field.
-
Prompt for path—Check this box to present a window to browse for a path. If this box is not checked, the PDF file will be saved in the path saved in Setup>Company Information>Company Default Paths or Setup>System Options>System Default Paths.
-
Prefix—This value will be part of the file name when it is saved.
- Select the desired option for Print paper copy to printer.
-
No—No paper copy is created.
-
Use Default Printer—Sends all selected reports to the Windows Default printer without presenting the Windows printer selection dialog.
-
Select Printer—Presents the Windows printer selection dialog for reports selected for printing.
Add a Report to a Report Group
- Click the Insert Row icon in the Data Bar.
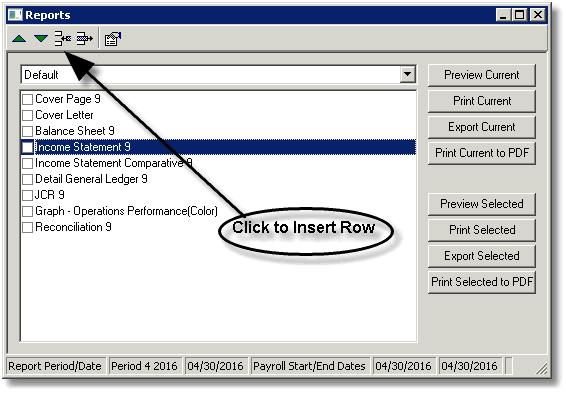
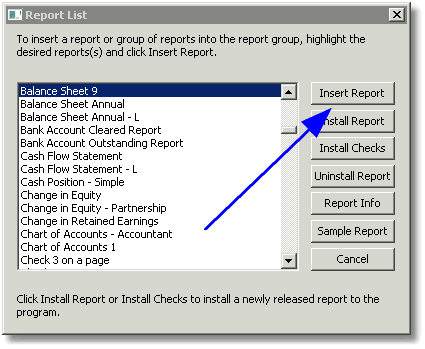
- Highlight the report or reports to add to the list and click the Insert Report button.
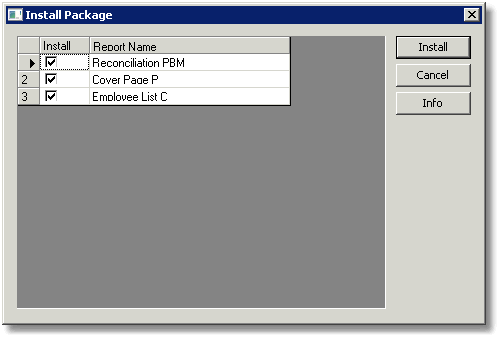
Install a New Report or Check
Add reports or checks to the Reports List that have been supplied.
- Select Install Report or Install Checks.
-
New Reports are displayed on the Install Package window. Select which individual reports or checks to install by clicking in the Install field to check the box, or right-click and choose Select All to select all reports.
- Click Install to move the reports to the Reports window.
Setting Global Options for Reports
Click the Options  icon in the Data Bar of the Reports window for global report options. Global report options affect all reports in the reports list.
-
Payroll Start Date—This determines the start date for all date range payroll reports. This date will default to a date that is determined by the setting of the Default Start>End Dates option (see below). See the list of reports that use this date following the help for the Default Start>End Dates option (see below). To print a report or reports using a different date range than the default, enter the desired start date for the report printing here.
-
Payroll End Date—Determines the ending date for all date range payroll reports. This date will default to a date that is determined by the setting of the Default Start>End Dates option (see below). See the list of reports that use this date following the help for the Default Start>End Dates option (see below). To print a report or reports using a different date range than the default, enter the desired end date for the report printing here.
-
Report Period Type—Select from Month, Quarter, or Year.
-
Report Year—Select a year to print reports for prior periods.
-
Report Period—Select a period to print reports for prior periods.
-
Report Date—This is what prints on the top of reports and will change automatically when prior periods have been selected. Edit the date to change.
-
Printer Select Mode—Select the desired Windows printer selection dialog.
-
Use Default Printer—Sends all selected reports to the Windows Default printer without presenting the Windows printer selection dialog.
-
Prompt for Printer—Presents the Windows printer selection dialog for reports selected for printing.
-
Print Job Mode
-
Combine—Sends all selected reports to printer as one print job.
-
Individually—Send selected reports to printer as individual print jobs.
-
Sort Checks—Sets the order in which checks will be numbered and printed.
-
As Entered—Numbers and prints in the order the checks were entered.
-
By Alpha—Numbers and prints in alphabetical order based upon the Pay to the Order of name.
-
By Payee Last, First, Middle—Numbers and prints in alphabetical order based on the Last, First and Middle names set up on the Contact tab.
-
Use Saved Check Numbers—Determines what the suggested next check number will be. The suggested next check number can always be changed in the print checks dialog when printing checks.
-
Yes—Increments to the next check number from the last check number used for each checking account.
-
No—Increments to the next check number from the highest check number ever used by each checking account.
-
Default Check Selection
-
All—Causes all checks in the print checks dialog to open with all checks selected to print. Clicking on the Pay checkbox for any check will toggle if unselected.
-
None—Causes all checks in the print checks dialog to open with none selected to print. Clicking on the Pay checkbox for any check will toggle if selected.
-
Default Report Selection
-
All—Causes all reports in a report group to be selected for printing when the report group window is opened. Clicking on the checkbox to the left of any report will toggle if unselected.
-
None—Causes all reports in a report group to be unselected for printing when the report group window is opened. Clicking on the checkbox to the left of any report will toggle if selected.
-
Default Start>End Dates—The setting of this option determines what the default date will be for all Date range reports. The Payroll Start Date and Payroll End Date can be changed at any time by opening the Options window and entering the desired dates. The entered dates will be the dates used for printing of these reports until the Reports window is closed and reopened, or until the Options window is opened again, in which case the Payroll Start Date and Payroll End Date will return to the default as determined by this option.
-
Current Report Month—Sets the Start Date to the first day of the current month and the End Date to the last day of the current month, where the current month is the current processing month as displayed on the lower right of the program window frame.
-
Last Pay Through Mo.—Sets the Start Date to the date that the last payroll check was created and the End Date to the last day of the current month, where the current month is the current processing month as displayed on the lower right of the program window frame.
-
Last Payroll—Sets the Start Date and End Date to the date that the last payroll check was created.
-
Last Used—Remembers that last Start Date and End Date settings and only changes when manually entered.
-
The following reports use the Payroll Start>End Dates:
- Check Register—Payroll
- Payroll 401(k)—Simple (s)
- Payroll Check Register
- Payroll Cover Letter (s)
- Payroll Departmental Earnings
- Payroll Journal Entries
- Payroll New Hire Report
- Payroll Period Totals by Date
- Payroll Register by Date
- Payroll Register Detailed by Date
- Payroll Summary
- Payroll Tax Summary by Date
-
Always Run Balance Check
-
Yes—Select yes so that a balance check will be performed, making sure the GL is in balance.
-
No—The GL balance check will not be performed.
-
Default PDF prefix>filename—Controls the information used for the file name suggested for the PDF file.
-
Custom PDF prefix>filename—Defines the custom phrase used in Option 17 setting. This field supports two wildcards:
-
%name%—this phrase will be replaced with the company name of the client.
-
%DBA%—this phrase will be replaced with the DBA name of the client.
-
Print PDF Default—Preselects the option in the Export to PDF dialog box for the client.
- Print to File
- Print to VO
- Print to VO Review
- Remember Last
-
PDF Paper Copy Default
- Default Printer
- No
- Remember Last
- Select Printer
-
Mask SSN (where applicable)
-
Yes—Prints SSN as ###-##-1234
-
No—Prints full SSN (where applicable).
Headers Footers tab
-
Use System Headers—Applies to the optional Crystal Reports Report Generator which is not applicable at this time.
-
Use System Footers—Applies to the optional Crystal Reports Report Generator which is not applicable at this time.
-
Extra Header Data (if available)—Selecting yes causes all reports that support this option to print the client's name and address on the upper left for the report and the office name and address on the upper right of the report.
-
Hide Period in Header—Yes removes the period information from the header of all reports.
-
Show Reference—Prints a reference number either in the upper right corner or lower left corner of all reports.
-
Show Page Number—Prints a page number for reports in the lower left corner of the report. Numbering applies to the number of pages for each report, not the number of pages in a batch of reports.
-
System Disclaimer—Record a disclaimer here that will be printed in the footer section of all reports that support a disclaimer for all clients unless there is a Client Disclaimer, System Report Disclaimer or Client Report Disclaimer (see report-specific options below) recorded for the client. If the disclaimer is longer than one line, the program will break the text into multiple lines. A hard return can be added where desired by typing two backslashes (\\). There cannot be blank spaces after the backslashes.
-
Client Disclaimer—Record a disclaimer here that will be printed in the footer section of all reports that support a disclaimer for the current client only, unless there is a Client Report Disclaimer or System Report Disclaimer (see report-specific options below) recorded for a specific report. If the disclaimer is longer than one line, the program will break the text into multiple lines. A hard return can be added where desired by typing two backslashes (\\). There cannot be blank spaces after the backslashes.
Profit Center Reporting
Profit Center reporting is made possible by coding accounts with a pattern that can be filtered using wildcards. Filters are recorded in Income Statement reports using the report option Account Name Filter.
- Edit existing account Lookup codes using Utilities>Recode Accounts. Keep in mind how the Account Name Filter option works when defining the Lookup codes for accounts.
-
*—When an asterisk is added to the end the phrase, the system accepts all characters to the right of the symbol. When this is the first character, the system accepts all characters to the left of that position.
-
?—The system accepts any characters in the position of the question mark.
-
Example: Structure the account Lookup codes where the last two characters identify the profit center, such as 01 being profit center one and 02 being profit center two.
- Insert an Income Statement report into the client's report group for each profit center.
-
Examples:
- Account Name Filter ???01 will produce a profit center report for profit center 01 if the Lookup codes for all accounts are 5 characters in length.
- Account Name Filter ???01* will produce a profit center report for profit center 01 if the profit center identifier is always the 4th and 5th character and there are sometimes additional characters such as 51601.1.
- Account Name Filter *01 will also print a report for profit center 01 which will include all accounts with Lookup codes ending in 01 regardless of the number of characters used in account Lookup codes.
- Set the Account Name Filter to print the desired profit center for each incident of the report.
- Highlight, right-click, and rename each income statement report to identify the profit center it will print for. For example, rename Income Statement 9B as Income Statement 9B 4th & Main.
Report Update>Change Information
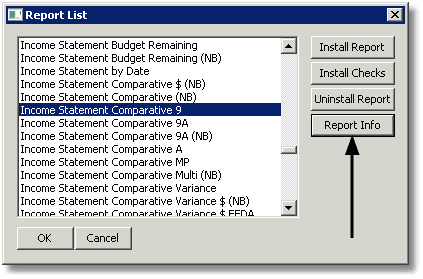
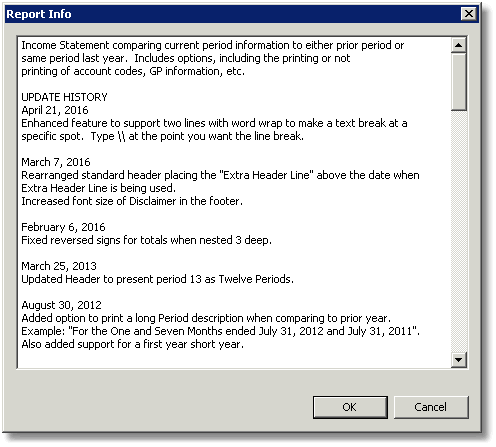
Information about changes or updates to a specific report is available.
To review report information:
- Select Reports>Report List.
- Select the Insert Row icon.
- Click on ONE report to select it.
- Click the Report Info button.
Sample Report Information:
Comments
0 comments
Article is closed for comments.